
Your solar system sits on your roof, quietly working every day — but you cannot see what is happening at the cell level, inside the inverter, or behind the wiring. That is exactly why a professional solar panel inspection matters. It is the only way to catch hidden problems before they become expensive repairs, voided warranties, or safety hazards.
This guide covers everything — what a solar panel inspection actually involves, the full checklist inspectors use, how much it costs, how often you need one, and how to choose the right inspector for your system.
What Is a Solar Panel Inspection?
A solar panel inspection is a professional evaluation of your entire solar energy system — not just the panels themselves. It covers the panels, mounting hardware, wiring, inverter, monitoring system, and roof interface where your system attaches to your home.
The goal of a solar panel inspection is simple: confirm your system is safe, code-compliant, and performing the way it should. Inspectors look for issues that are often invisible from the ground — micro-cracks, loose connections, hot spots, and early signs of wear that do not yet show up on your electricity bill but will eventually.
A solar panel inspection is different from cleaning. Cleaning removes dirt and debris from the panel surface. An inspection is a diagnostic evaluation of the entire system’s health — even spotless panels can hide serious issues underneath.
Types of Solar Panel Inspection
Not all inspections are the same. Here is what is available and when you need each one:
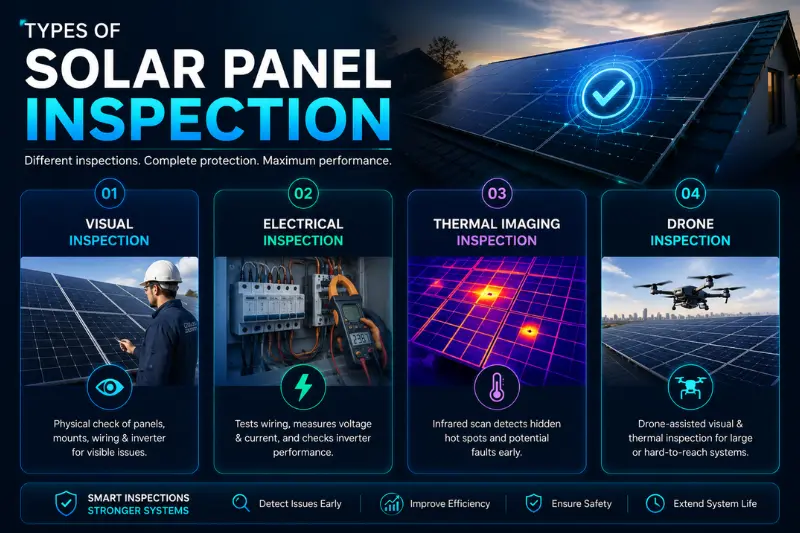
Visual Inspection
The most basic and most common type. A technician physically examines your panels, mounting hardware, wiring, and inverter for visible signs of damage, wear, or installation issues. Recommended as part of routine annual maintenance.
Electrical Inspection
Goes beyond the visible. Technicians test your system’s wiring, measure voltage and current on each string of panels, and check inverter performance against expected output. This type of solar panel inspection catches issues that look fine on the surface but are quietly reducing your system’s efficiency.
Thermal Imaging Inspection
Uses an infrared camera to detect “hot spots” — areas where panels are running hotter than they should, often indicating a failing cell, a loose connection, or a developing fault. Hot spots are invisible to the naked eye but show up clearly on thermal imaging. This adds $150–$200 to the cost of a standard inspection but can catch problems years before they cause a visible failure.
Drone Inspection
For larger systems, steep roofs, or hard-to-access arrays, drone-assisted inspections combine visual and thermal imaging from the air. This is faster, safer, and often more thorough than a technician walking the roof — particularly useful for commercial systems or multi-story homes.
The Complete Solar Panel Inspection Checklist
This is where most competitor guides fall short — they give vague overviews. Here is the actual checklist a thorough solar panel inspection should cover:
Panels themselves:
- Cracks, chips, or delamination (layers separating) on the panel surface
- Discoloration or browning, which can indicate degradation
- Cleanliness — heavy dirt, bird droppings, or debris affecting output
- Frame condition — bent, corroded, or loose frames
- Junction box condition and cable connections at the back of each panel
- Labels and identification tags still legible and intact
Mounting and structure:
- Racking and rail condition — corrosion, loose bolts, or misalignment
- Roof penetrations — checking for proper flashing and waterproofing
- Tilt angle — confirming panels remain at the correct angle for optimal sun exposure
- Cable management — wires properly secured and not exposed to weather or pests
- Overall structural integrity of the mounting system
Electrical components:
- Inverter condition, error history, and performance against expected output
- Wiring and conduit — secure routing, correct materials, no exposed or damaged sections
- Grounding and bonding — properly installed and code-compliant
- Disconnect switches — present, accessible, and correctly labeled
- Balance of system (BOS) equipment — combiner boxes, monitoring hardware, and other components
Performance and safety:
- Monitoring data review — comparing actual output against expected production
- Fault codes or error history from the inverter and monitoring system
- Shading analysis — checking for new shade sources like tree growth
- Open-circuit voltage and short-circuit current testing on each string
- Thermal imaging review (if included) for hot spots
Documentation:
- Plans and permits matching the installed system
- Array layout — confirming module count, placement, and orientation match the original design
- Warranty documentation review and update
How Much Does a Solar Panel Inspection Cost?
Solar panel inspection costs vary based on system size, inspection type, and your location. Here is what to expect in 2026:
Standard visual inspection: $150–$350 for most residential systems
Electrical inspection (includes wiring and performance testing): $200–$450
Thermal imaging add-on: +$150–$200 on top of a standard inspection
Drone-assisted inspection: $300–$800, depending on system size and complexity
Hourly labor rates (if charged separately): $60–$100 per hour
What affects your price:
- Number of panels and overall system size
- Roof height, pitch, and access difficulty
- Whether thermal imaging or drone services are included
- Your local labor rates and regional pricing
- Whether the inspection is bundled with cleaning or maintenance
Money-saving tip: Many solar companies offer annual maintenance plans that bundle cleaning and inspection together for $200–$800 per year — often cheaper than booking each service separately.
How Often Should You Get a Solar Panel Inspection?
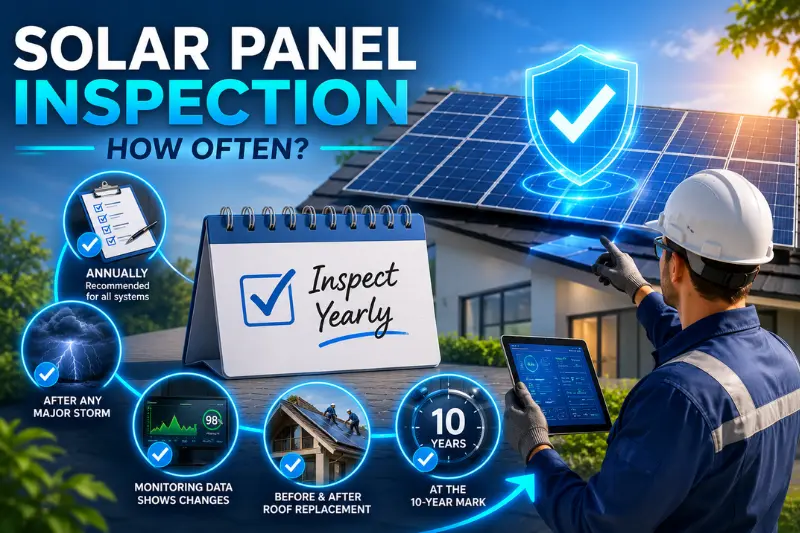
Annually (recommended for all systems): A yearly professional solar panel inspection is the standard recommendation across the industry. This catches developing issues early and keeps your warranty documentation current.
After any major storm: Hail, high winds, falling branches, or heavy snow loads can all cause damage that is not visible from the ground. Schedule a solar panel inspection after any significant weather event.
When your monitoring data shows unexplained changes: A drop in output of 10% or more that is not explained by weather or season is a signal to schedule an inspection right away — do not wait for your annual visit.
Before and after a roof replacement: If you are replacing your roof, your panels need to be professionally removed and reinstalled. A solar panel inspection both before removal and after reinstallation protects you from disputes about pre-existing damage.
At the 10-year mark: This is when inverters commonly begin showing signs of age. A more thorough electrical inspection at this milestone helps you plan for potential inverter replacement before it fails unexpectedly.
What Happens During a Professional Inspection Visit
Most competitor articles skip this — here is what actually happens, step by step:
- Initial consultation: The inspector reviews your system’s installation documents, warranty information, and any monitoring data you can provide.
- Visual walkthrough: A physical examination of all accessible panels, wiring, and mounting hardware, either from the roof or using a drone.
- Electrical testing: Voltage and current measurements on each string of panels, compared against expected specifications.
- Thermal scan (if included): An infrared camera sweep across the array to identify hot spots.
- Inverter check: Reviewing inverter performance history, error codes, and overall condition.
- Documentation: A written report detailing findings, any issues identified, recommended next steps, and updated records for your warranty file.
- Recommendations: If issues are found, the inspector explains whether they require immediate repair, monitoring, or can wait until your next scheduled visit.
A quality solar panel inspection always ends with a clear written report — not just a verbal “everything looks fine.”
Common Issues Found During Solar Panel Inspection
Here are the problems inspectors most frequently discover — and why catching them early matters:
- Micro-cracks: Tiny cracks invisible to the naked eye that gradually worsen, reducing output over time. Caught early, they can sometimes be monitored rather than immediately replaced.
- Hot spots: Localized overheating that indicates a failing cell or connection — a fire risk if left unaddressed.
- Loose mounting hardware: Bolts and racking that have loosened over years of thermal expansion and contraction, weather exposure, and vibration.
- Corroded connections: Particularly common in coastal areas, where salt air accelerates corrosion of electrical connections.
- Pest damage: Chewed wiring or nesting debris from birds and rodents underneath panels.
- Shading from tree growth: Trees that have grown since installation, gradually reducing your system’s output without you noticing.
- Inverter degradation: Early signs that an inverter is approaching the end of its 10–15 year lifespan, allowing you to plan and budget for replacement.
How to Choose a Solar Panel Inspection Company
Look for independence. A solar panel inspection from a company that has no financial interest in selling you new equipment gives you a more objective assessment. Some homeowners choose a third-party inspector specifically for this reason.
Check for proper certifications. NABCEP-certified technicians meet rigorous industry standards. Ask whether the company’s inspectors hold this certification.
Ask what is included. A $150 inspection that only covers a visual walkthrough is very different from a $350 inspection that includes electrical testing and a written report. Get clarity before booking.
Request a sample report. A reputable solar panel inspection company can show you what their reports look like — detailed reports with photos and clear findings are a sign of quality.
Ask about warranty documentation. Confirm the inspection report will be formatted in a way that satisfies your manufacturer’s warranty documentation requirements.
How much does a solar panel inspection cost?
A standard visual inspection typically costs $150–$350. Electrical inspections with performance testing run $200–$450. Adding thermal imaging costs an additional $150–$200, and drone-assisted inspections for larger or harder-to-access systems range from $300–$800.
How often should I get a solar panel inspection?
Most homeowners should schedule a professional solar panel inspection annually. Additional inspections are recommended after major storms, when monitoring data shows unexplained output drops, before and after roof replacements, and around the 10-year mark when inverters commonly begin aging.
What is the difference between solar panel inspection and cleaning?
Cleaning removes dirt, dust, and debris from the panel surface to restore lost efficiency. Inspection is a diagnostic health check of your entire system — panels, wiring, inverter, mounting, and performance data — looking for hidden issues that cleaning alone would not reveal or fix.
What does a solar panel inspection checklist include?
A thorough inspection checklist covers panel condition (cracks, delamination, discoloration), mounting and structural integrity, electrical components (wiring, grounding, inverter), performance data (monitoring history, fault codes), and documentation (permits, warranty records).
Can a solar panel inspection find problems I cannot see?
Yes — this is the entire point. Micro-cracks, hot spots, corroded connections, and early inverter degradation are all typically invisible during a casual glance at your roof. Thermal imaging in particular reveals issues that would otherwise go unnoticed until they cause a noticeable performance drop or failure.
Do I need a drone inspection, or is a visual inspection enough?
For most single-story homes with easily accessible roofs, a standard visual or electrical inspection is sufficient. Drone inspections become valuable for larger systems, steep or multi-story roofs, commercial installations, or when thermal imaging is needed across a large array efficiently.
What happens if my solar panel inspection finds a problem?
The inspector’s report will explain whether the issue requires immediate repair, ongoing monitoring, or can be addressed at your next scheduled visit. If your system is still under warranty, the inspection report often serves as the documentation needed to file a warranty claim for repair or replacement.
Final Thoughts
A solar panel inspection is one of the smallest investments you can make to protect one of the largest investments in your home. It catches the problems you cannot see, keeps your warranty valid, and ensures your system keeps generating the savings you expected when you went solar in the first place.
Schedule your annual solar panel inspection, keep your documentation organized, and address any findings promptly. A little attention now prevents a much bigger bill later.